Zendesk Support for WooCommerce

$129.00 / year

Zendesk Support organises your store by managing customer orders and enquiries at one place with a proper trail and hassle-free environment

Zendesk Support for WooCommerce will simplify your business operations and give you peace of mind. It provides you with a platform where you can manage customer orders and related issues — all in one place.


The Zendesk Support for WooCommerce plugin provides valuable features for managing customer orders.

  • Easy to integrate
    Integrating this plugin is very straightforward. Copy-paste your SubdomainUsername, and Access token from your Zendesk account, save changes, and your WooCommerce store is now integrated with Zendesk.
  • Keep track of orders and emails in one place
    When an order or inquiry is placed by the buyer, a new ticket is automatically generated in Zendesk for the customer. You are notified via email and in your Zendesk account. You can easily follow up on the relevant ticket accordingly.
  • Sort customer orders easily
    You can sort and arrange customer orders based on status, customer name, tags, priority levels, etc.
  • Make notes and tag teammates for easy management of customer-related issues
    You can make notes for your consideration and assign the ticket or task to the relevant team member according to the inquiry made by your customer. You can proceed with all internal and external communication on the same ticket without notifying the customer, by setting the access level for different accounts in Zendesk.
  • Scrutinize your orders by the status
    With Zendesk support integration, you have the capability to filter the orders based on the status of the order.
  • Set priority levels for your customer’s enquiry
    Depending on the severity of issues, you can set priority levels for enquiries made by your clients.

In today’s fast-moving world, proper time management and customer satisfaction are very important to run a successful business! Zendesk Support for WooCommerce keeps your records in one place, and you don’t have to move back and forth between tabs to see related information for your customers. With Zendesk Support for WooCommerce, your time is freed up and customer support becomes more seamless.

Requirements

Minimum PHP version: 7.0

Zendesk Support for WooCommerce is an ultimate solution for orders management — try it today!

At Woocommerce.opmc.com.au, we want to ensure that you are 100% happy with your purchase.

  • If you have technical or sales queries, do not hesitate get in touch with us
  • If after you attempted to resolve issues with Support staff and feel the product(s) you purchased does/do not the best fit your requirements, we want to make things right.

Our policy offers a full refund within 30 days of your date of purchase. We’d love to know what went wrong and how we can improve, so please include details about the reason for your refund request if you reach out to us directly.

Woocommerce.opmc.com.au and our payment process submit the refund immediately and make every attempt to process the refund as quickly as possible. Your financial institution can take up to 20 days for the refund to reflect in your bank account/card.

Zendesk Support for WooCommerce

Zendesk is a cloud-based customer relationship management system that is trusted by hundreds of thousands of businesses worldwide. It is one of the leading customer support services that allow you to interact with your clients at any platform. With the help of our Zendesk Support plugin, you can easily integrate your wooCommerce’s store to Zendesk Account. 


Installation

  1. Download the .zip file.
  2. Go toWordPress Admin > Plugins > Add New and Upload Plugin with the file you downloaded with Choose File.
  3. Install Now and Activate your Zendesk Support plugin.

Accessing the plugin’s settings:

Upon activating the plugin for the first time, there should be a banner along the top of your screen. Click the link to access the plugin’s settings.

Alternatively, you can access the settings using the method below:

  1. In your WordPress admin page, navigate to WooCommerce > Settings 
  2. Click the Integration > Zendesk Support Integration.

Creating an Account on Zendesk

If you already have a Zendesk account set up, feel free to skip this step. 

  1. Click here to sign up and activate your free trial.
  2. You will be redirected to set up and will be asked to enter your Work email address. Enter your email address and click Next.
  3. Enter firstlast name and phone number and click Next.
  4. On the next step, you will be asked to enter your Company nameNumber of employees, your Zendesk subdomain and Password. Enter your information, answer the question by selecting Manage customer support requests and click Complete trial signup.
  5. Upon activating your Zendesk, a verification email will be sent to your email address. Click on the link to verify your account. On successful verification, you will be redirected to the dashboard of your zendesk account.
  6. You have successfully signed up for your Zendesk account.


Linking your website to your Zendesk account


  • Goto: your WP Dashboard> WooCommerce > Settings > Integration > Zendesk support Integration
  • In subdomain tab, enter the subdomain name you have set for your zendesk account. For example, in ‘mycompany.zendesk.com’, the ‘mycompany’ is the name of your subdomain.
  • In Auth type, select Token or Password from the dropdown menu. 


Obtaining API credentials 

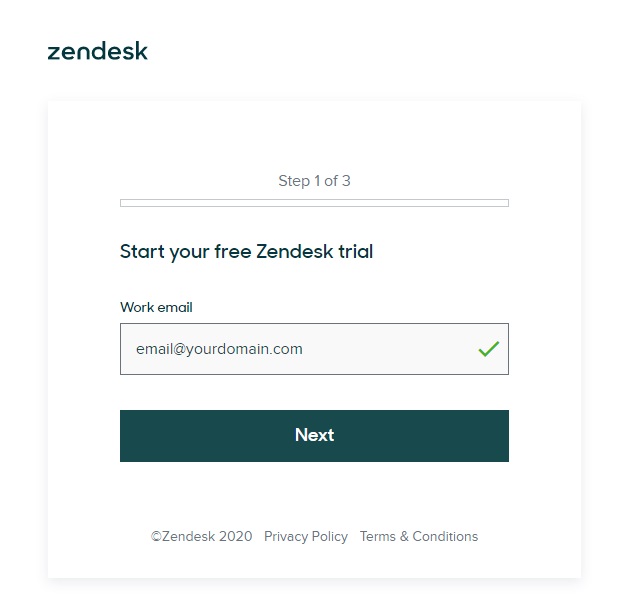
Once you have set your zendesk account, goto the zendesk dashboard on the left-hand side, click the admin icon  and then scroll down to channels and click on API

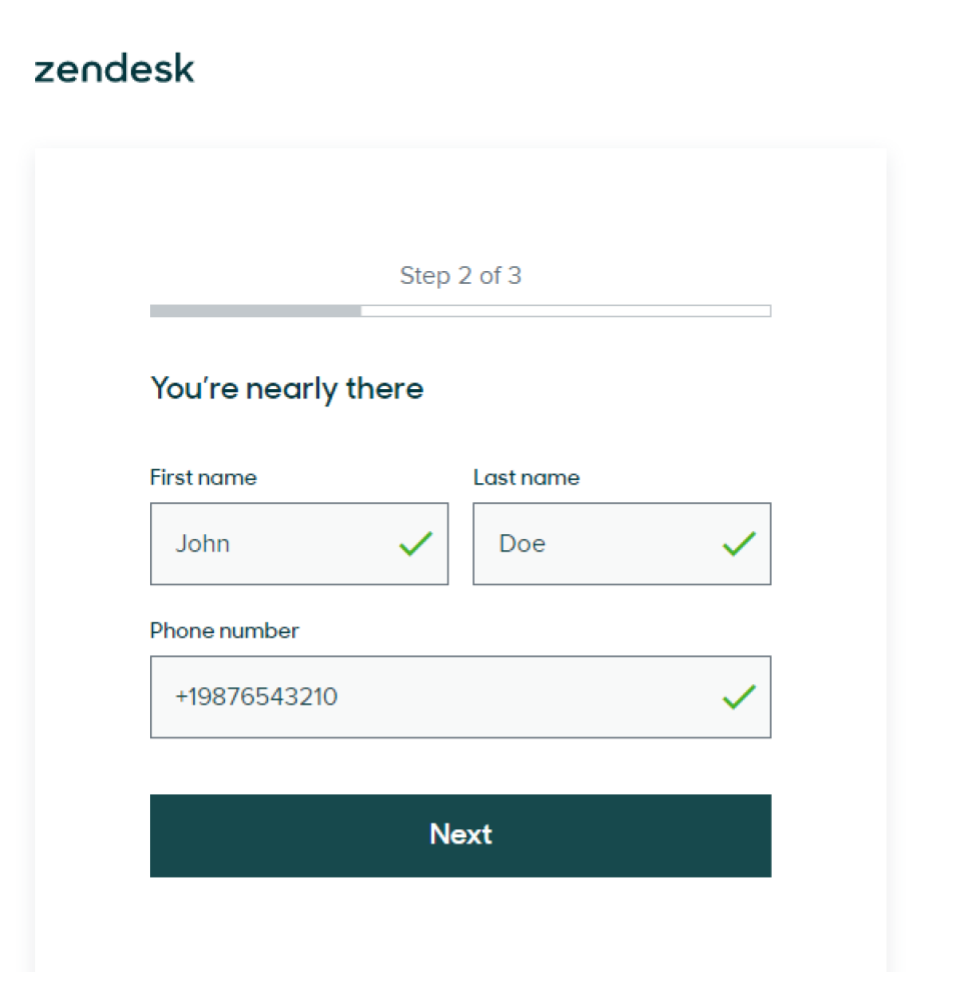
For first time users, the agreement statement would be visible, check it and click
Get started.


For Token-based settings

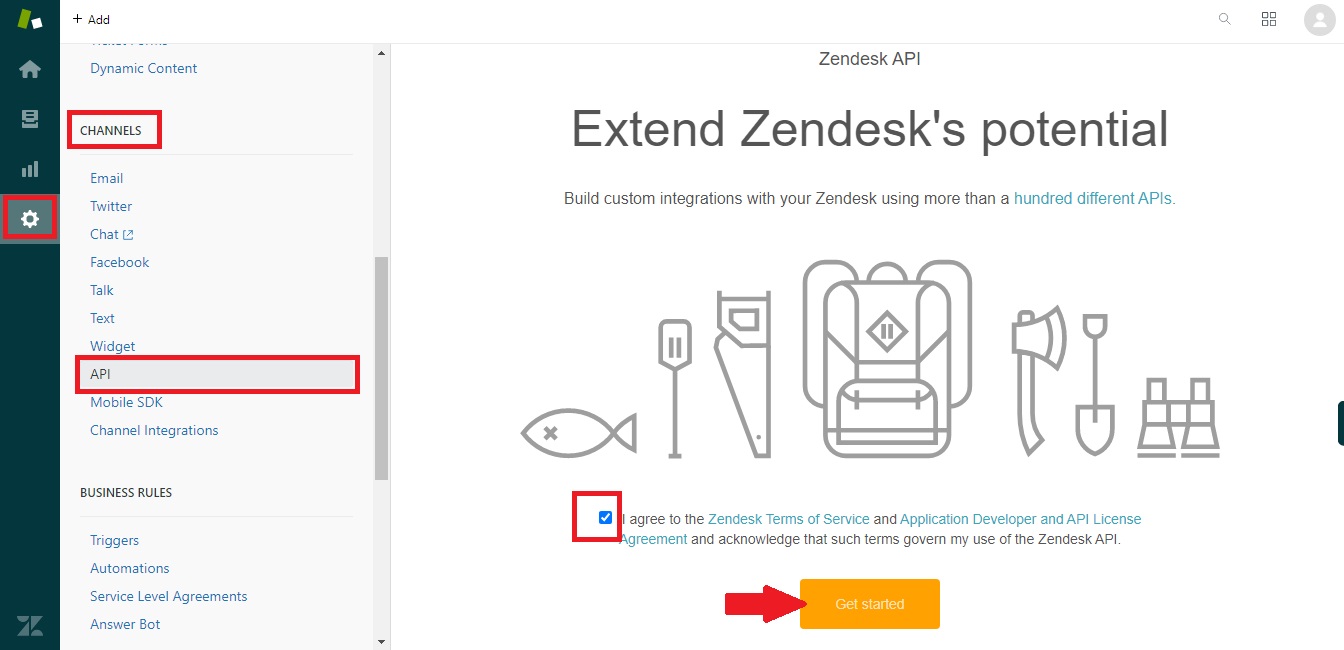
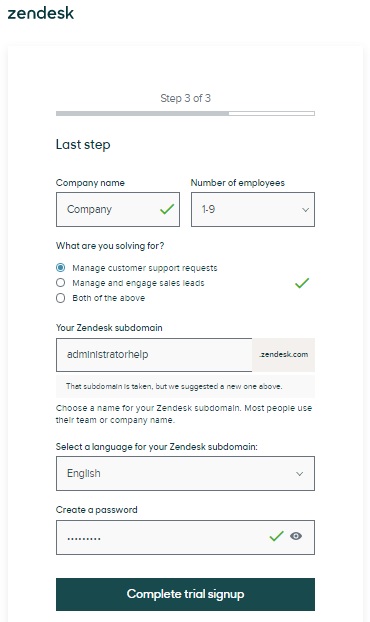
Enable Token Access and click on the plus sign below to set Active API Token. 

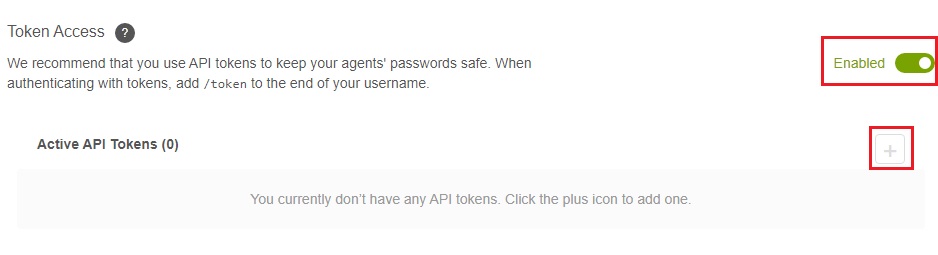
After clicking on the plus sign a tab will open containing your API Token. Give the token any name in API Token description and copy the API Token and store it to a secure place as it won’t be shown again.

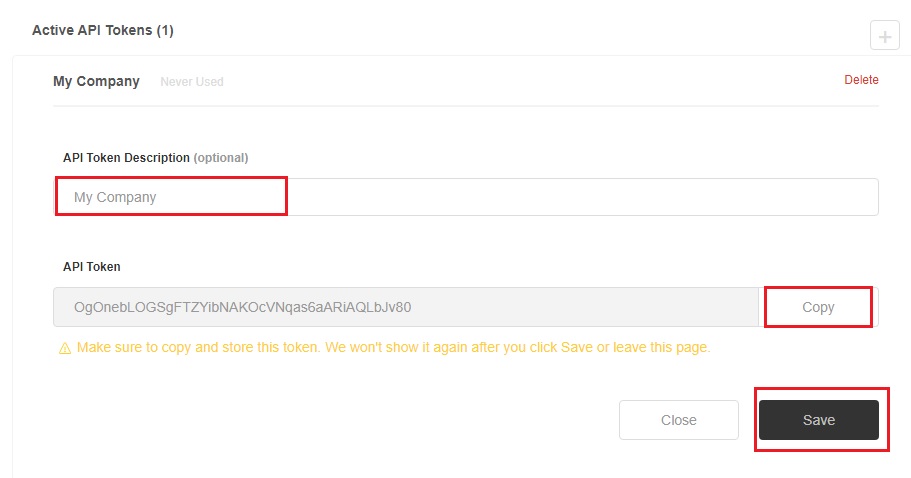
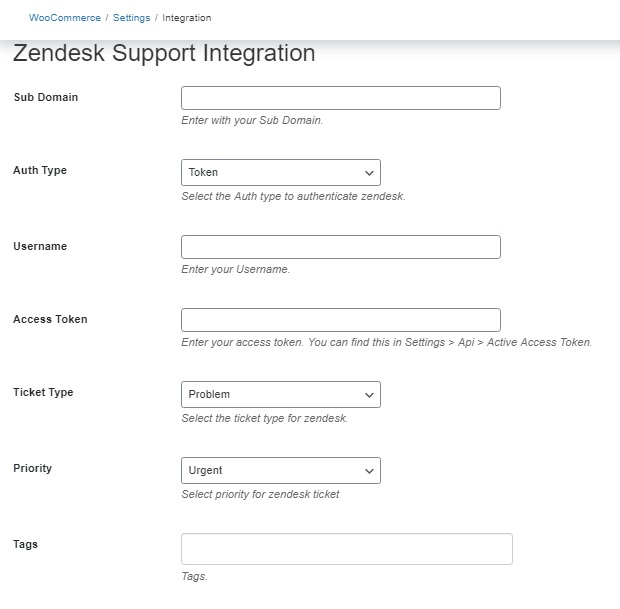
Click save and paste your API Token to Access Token tab in the Zendesk Support Integration menu in your WooCommerce store settings. 

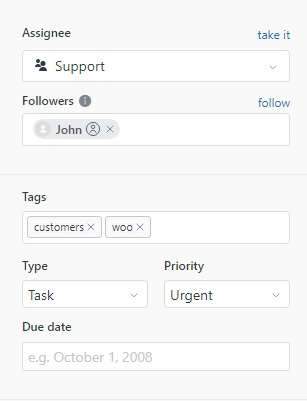
Set Ticket Type and Priority from the drop-down menu. 

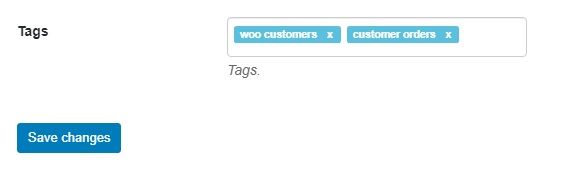
Enter Tags. You can enter more than one tags by entering “comma” after every tag for your zendesk tickets and click Save changes.
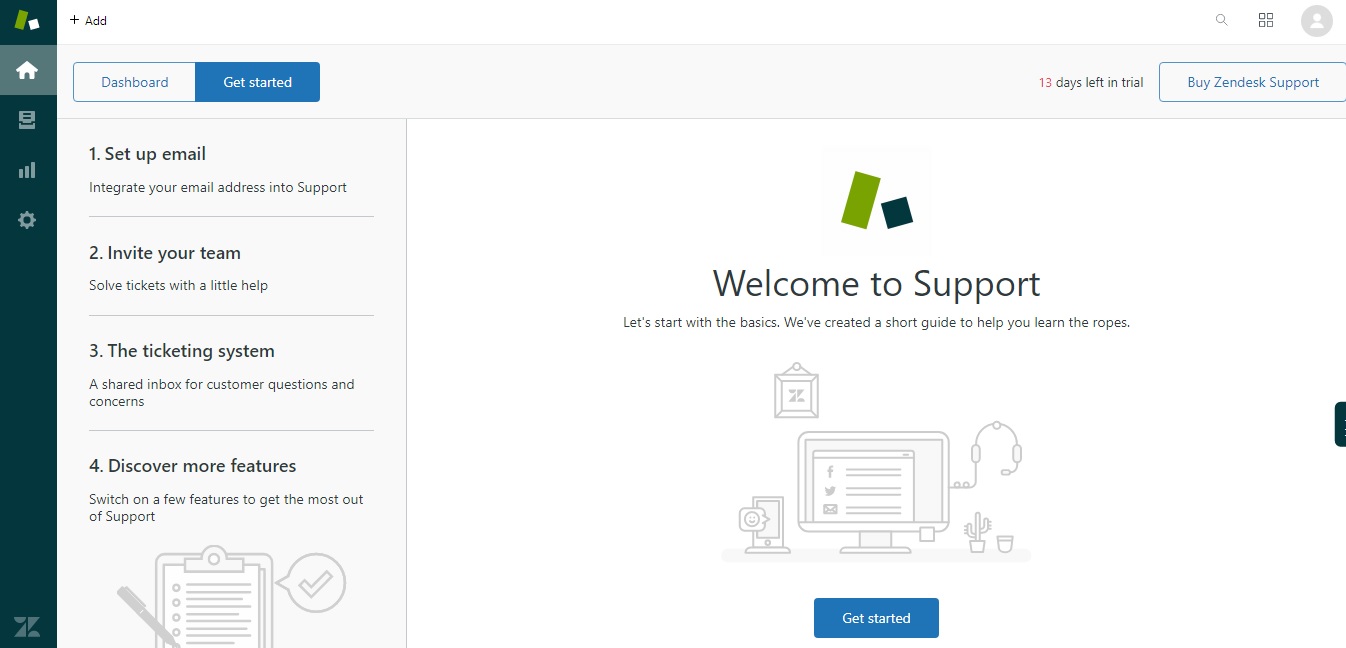
You are all set up!


For Password-based settings

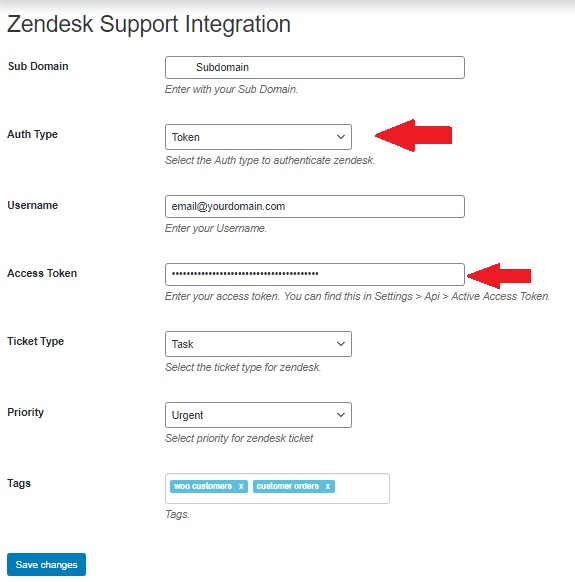
For Password-based settings, goto the zendesk dashboard on the left-hand side, click the admin icon  and then scroll down to Channels and click on API. Enable Password Access.

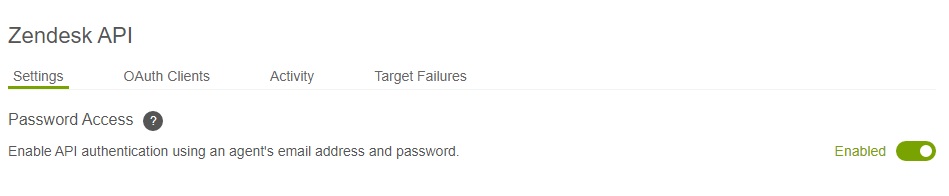
Goto: Your website Dashboard > WooCommerce > Settings > Integration > Zendesk Support Integration and enter the password that you have set for your zendesk account and do rest of the settings as mentioned in token-based settings and click Save changes. You are all set up.


Usage

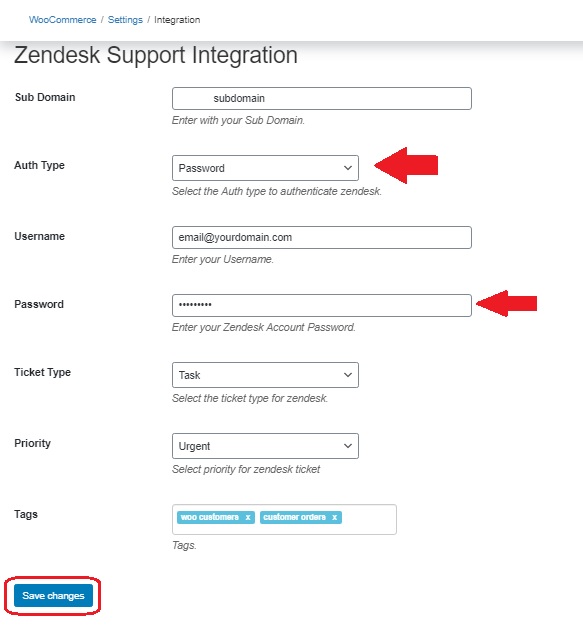
When an order or enquiry is placed by the buyer a new ticket is automatically generated in Zendesk for the customer. You are notified via email and in your zendesk account.

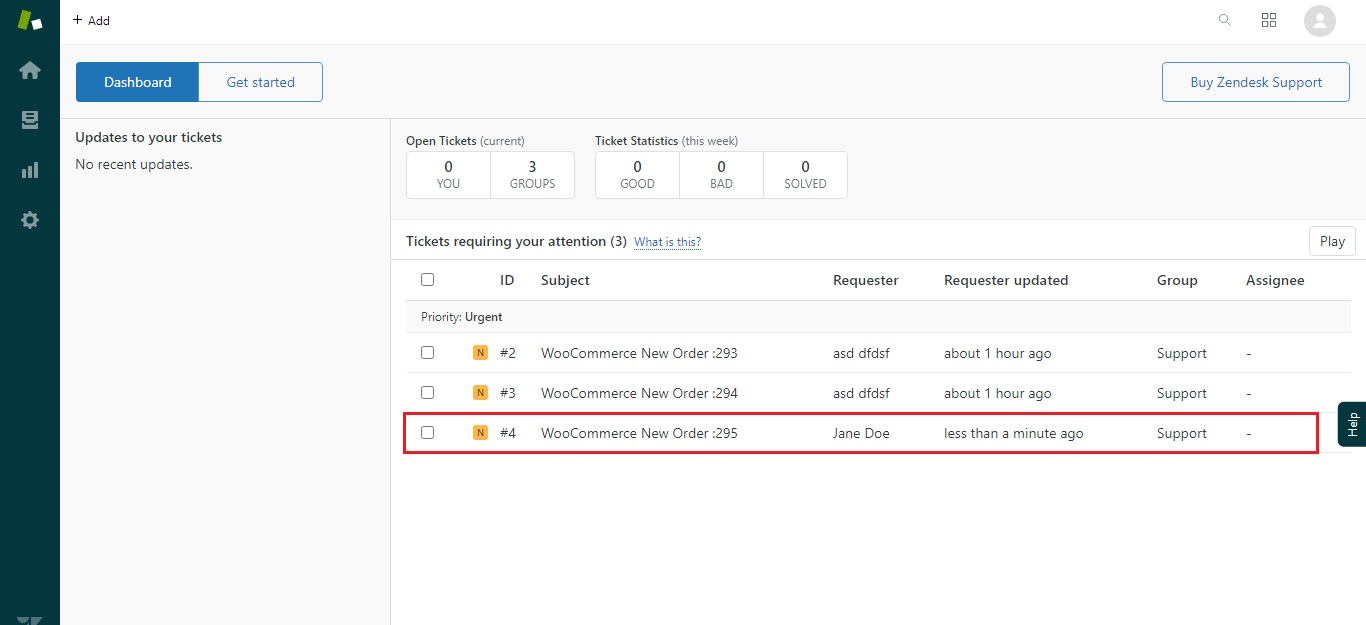
 You can easily take follow up on every ticket and enquiry. You can communicate internally and with the customer on the same page with a complete trail of record.


Assign ticket to team members

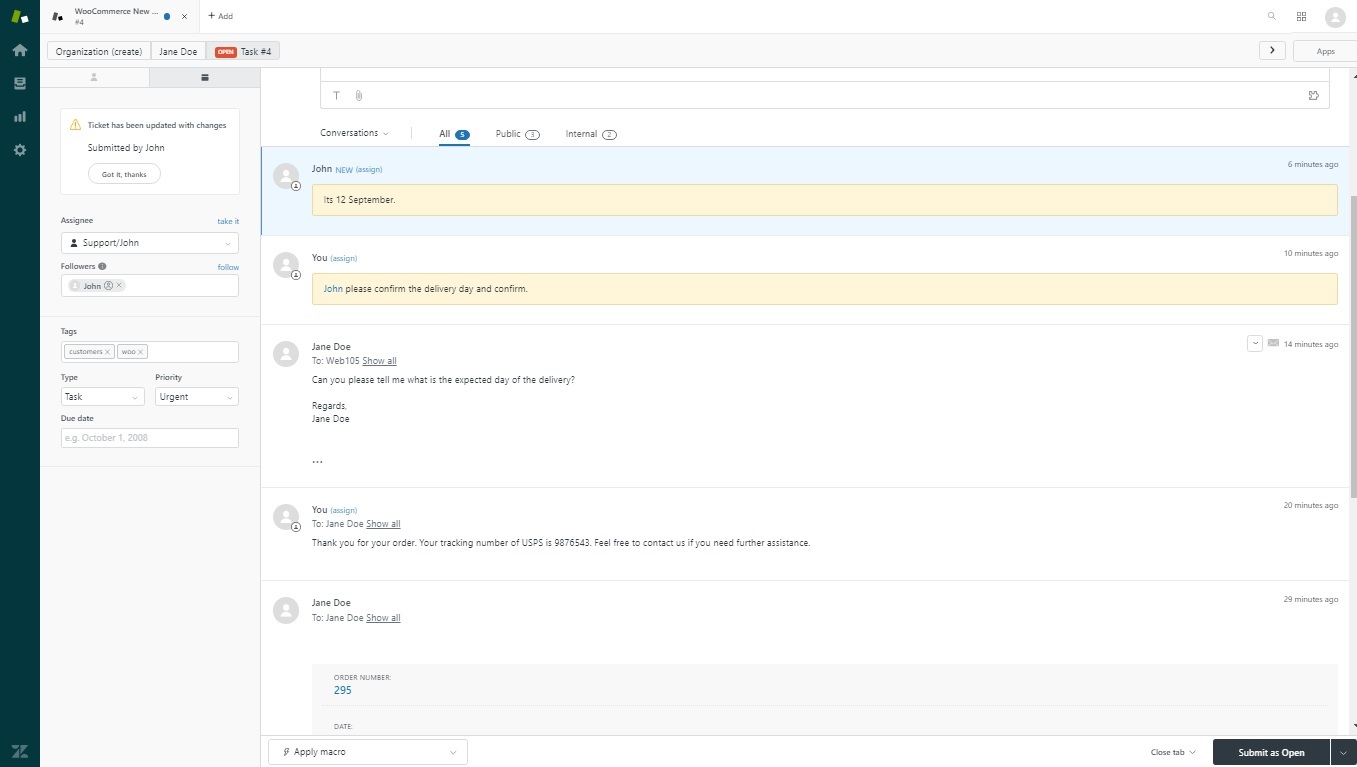
You can assign the ticket to your team member or department for better understanding and quick resolution of the enquiries by adding followers or assignee.

How Customer’s order is recorded in Zendesk Account?

The Order will be recorded as a new Ticket and associated with the customer account.  The customer account will be created if it does not already exist.


If I am already using Zendesk Account, how could I differentiate my WooCommerce customers orders from other tickets?

Zendesk Support Integration plugin will allow you to specify a Tag for WooCommerce orders. Our plugin will allow you to choose the type of ticket in Zendresk Support for WooCommerce Orders.

By purchasing the Zendesk Support for WooCommerce plugin, you will be able to gain access to a downloadable .zip file. When you purchase this plugin, you are assigned an account and license key. This gives you access to one year of premium support and updates.

Basic Setup:

  1. Purchase the Zendesk Support for WooCommerce to get started.
  2. Download the .zip file to your device.
  3. On your website, Go to: WordPress Admin > Plugins > Add New to upload the file you downloaded with Choose File.
  4. Activate the plugin in Plugins > Installed Plugins.
If you have a question about our Zendesk Support for WooCommerce plugin, please feel free to contact our support team.

Reviews

There are no reviews yet.

Be the first to review “Zendesk Support for WooCommerce”

Your email address will not be published. Required fields are marked *

Zendesk Support for WooCommerce
$129.00 / year